New Pattern for a New Year
I wanted to give my daughters something hand knit for Christmas this year, but like the shoemaker’s children, it looked like they were going without. Two days before the Big One, I adapted this little project from Cheryl Niamath on Ravelry by changing gauge, and adding a repeat and an easy gusset that makes the mitt fit! I used Jade Sapphire 4-ply 100% cashmere (it was Christmas, after all), but any sport weight yarn will do. Blue Sky Alpacas Sport or Melange Alpaca loom large as an alternative, since they come in so many luscious colors…
Happy New Year to all,
Chris

CHRISTMAS FINGERLESS MITTS
– 1 skein Jade Sapphire 4 ply 100% cashmere or 2 skeins Blue Sky Alpacas Sport or Melange 100% Alpaca
– Size 4 DP needles or whatever configuration of needles you prefer for knitting in the round
– One size 5 needle, any type
– Cable hook
– Coilless safety pin
– 2 stitch markers
– 8” scrap of waste yarn
GAUGE: Of course this is a stretchy item, but on a table, the cuff measures 2 ¾” across, the hand (no gusset) measures 3” across. Cuff = 2 ¾” long, overall length of mitt about 7”.
(Note instructions for Right and Left Hands! Remember to make one for each.)
Cast on 51 sts onto one needle. *(K4, P1) 3 times for 15 sts, drop needle, pick up another dp needle, *(K4, P1) 4 times for 20 sts, drop needle, pick up another needle, *(K4, P1) 3 times (15 sts). One stitch remains. Put that stitch on first needle immediately next to first stitch, being careful not to twist the stitches on the 3 needles; knit these two stitches together. (50 sts) Your knitting is now joined in the round. Knit in pattern as established:
(K4, P1) for 4 rows. Place coilless safety pin into knitting to mark the beginning of round (your casting on tail will give you a clue) and move up pin as necessary.
Cable Row: *(Place 2 sts on cable hook and hold in back of knitting, k next two sts, k 2 sts from cable hook, P1) repeat around row.
Work next 5 rows in K4, P1, pattern, then repeat cable row.
Do this for a total of 5 cable twists. The cuff is now complete.
Work 9 more rows of (K4, P1) stitch pattern.
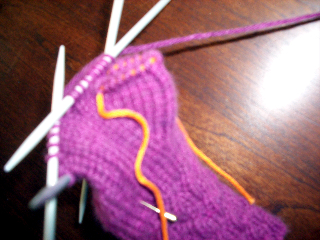
")
Markers show first set of increases
RIGHT GUSSET: New row: Work 8 sts, place marker, K2, place second marker, work to end of round.
Row 1: Work in pattern to first marker, slip marker, M1 (see below), K to last st before marker, M1, slip marker
Row 2: Work in pattern, but inside markers, just knit
Repeat these two rows until 16 stitches lie inside the two markers.

Gusset is formed - 16 stitches!
Next row: Knit to the last stitch before the first marker, M1 (that’s right—just wait!), knit all they way around back to first marker. Remove first marker. Slip first stitch from gusset onto right needle. Place 14 sts for thumb gusset onto waste yarn. Replace slipped stitch from right needle back to left needle and knit two stitches together. Continue in pattern for 16 rows.
Waste yarn holds the gusset stitches
Work Cable Row, then a further 4 rows. Then *(K1, K2 tog, K1, P1) around for last row, and bind off using the larger needle.
RIGHT THUMB: Knit 7 sts from the 14 sts on waste yarn onto one DP needle. Repeat, using another DP needle. Then, using a third, pick up two sts from “hand” side. Shift sts around so you have 6 sts on “hand” needle, and 5 on each of the other 2 needles. Work 4 rows. Then work (K1, P1) for 3 rows. Using the size 5 needle, bind off.
LEFT GUSSET: Work to 10 sts before start of round, place marker, K2, place second marker, work 8 sts in pattern. (End of round). Work another round in pattern. Continue as above.
MAKE ONE: Two increases will work nicely here. A “newer” increase will create a straight line along the ”V”. Here’s how to do it: Slip the first marker, with point of right needle, lift the lower side bump of the next stitch and place it on left needle, knit it, then knit the stitch itself, K to second marker, then with point of left needle, lift the lower side bump of the last stitch worked and knit it.
Another increase, the familiar “Knit into the front and the back” of the stitch before the first marker and the last stitch before the second marker will produce a line of little bumps along the “V” of the gusset.

I love it!! Anne
cool
Thanks — great pattern!!
Beautiful! I might give these a try!
Pam
http://thelittleteapotblog.blogspot.com/
Love this pattern – I made these for my daughters this year (after Christmas but they didn’t mind!) I am hoping to make some for myself! 🙂